 |

|
How to Record Conversations
the Way the Pros Do It
Before I go any further I urge you to become familiar with the specific laws concerning recording of conversations in the state in which you reside. Some states permit recording of a conversation in which at least one party gives consent to be recorded. That party would be you. The theory is that you are a part owner of the conversation and are entitled to make notes of it, electronically or in any other way, including recording. Other states specifically forbid any recording of any conversation. In any event it is always illegal to record a conversation in which you are not a participant and for which no conversant has given permission. Please consult law enforcement authorities to determine the legalities of recording conversations in your state. Telephone Conversations are the easiest to record since you are not physically in the presence of the other conversant. Also, you can set up your recording equipment and initiate the call on your schedule once you are prepared. There are several ways of recording a telephone conversation, some much better than others. The simplest and least intelligible way is to hold a cassette recorder or microcassette recorder near the telephone receiver during your conversation. This results in satisfactory recording of your voice but extremely low pickup of the voice on the other end. Also, ambient noise at your location will be recorded. The next method is by connecting a suction-cup magnetic pickup device to the telephone receiver. When most telephones were the old style handsets commonly used on paystations this method was the best available. Nowadays with electronic telephones, the pickup is marginal and positioning of the suction cup is critical. Also, because the suction cup device really picks up strong magnetic fields, it tends to amplify hum from nearby power lines and fluorescent lights nearby. In summary, this method will result in a recording of the conversation, but usually with hum. Law enforcement agents in the field have used this method over the years to call targets of their investigations using public phones. It is easy because it requires no electrical connection to the telephone. The tradeoff is quality of recording. By far, the best way to record a telephone conversation is by direct electrical connection between the telephone and the cassette or microcassette recorder. This is simply done with the use of a device appropriately named “telephone recording adapter” and is available from most electronics outlets, including Radio Shack. Typically the device is a small box with a wire terminating in a modular telephone plug and another wire that plugs into the microphone input of your recorder. There is usually a modular jack on the unit as well. To use, simply unplug your telephone’s modular plug from the wall, plug in the adapter instead, and plug the phone cord into the adapter’s jack. Then connect the adapter to the recorder. Tapes made using the adapter will be clear and include both parties. Follow instructions included with the adapter. Some adapters include an additional plug for remote-controlled recorders to start the recorder going automatically whenever the phone is off the hook. Regardless of the method you use, it
is important to make several test recordings to determine that all equipment
is operating properly, and to become familiar with recording a conversation. Important. If there is a voice-activation
mode on your recorder, turn it OFF. You want to record continuously.
The voice-activation (or VOX) feature is used when a recorder is left
unattended and it is desired to have the machine turn on in the presence
of any activity above a factory pre-set threshold level, and turn off
when the sounds fed into it are below that level. Thus, if there are
pauses in a conversation, or even low whispering, the machine could
turn off at these times. This makes the introduction of the tape as
evidence a little trickier and could lead to doubt as to the authenticity
of the recording since it is impossible to determine the length of time
that the recorder was off during pauses, and just ho much of a conversation
has not been recorded. Also, the elapsed time of the resulting recording
will not agree with your announced begin and end times in your preamble
and postscript. It is best to disable this feature and record continuously.
(I have examined tapes with hundreds of voice-activation stop-starts
in them) Once the recording has been protected you should playback at least a little part of it to make sure that the machine worked properly and that the conversation was recorded. Then the tape should be labeled as to date, time and participants, and placed with its case into an envelope and stored for future use. Should the need arise, it can be duplicated, enhanced, transcribed, and played at a legal proceeding. You have now followed the same procedures that law enforcement agents employ during their investigations in order to preserve the integrity of recordings made in the field.
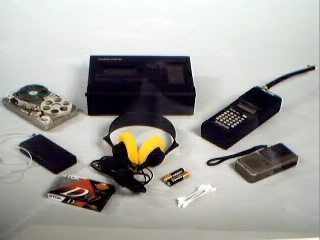
Face to face recording of conversations is easy if you plan ahead. One of my professors once said, “if you do 90% planning, you only have to do 10% work” and this is an example of that principle in practice. Let’s assume that you are going to record a conversation between you and another party. Clearly you need to have maximum pickup of both your voice a well as that of the other conversant. Some common sense measures can be employed to maximize the likelihood of a successful recording. First, pick a quiet environment. An auto interior is ideal with the radio turned off. Cars are designed to minimize the pickup of exterior noise. A restaurant is another common location for meetings. Restaurants can range fro quiet to very noisy. Select carefully as to restaurant, and time of day. Some places are dead until lunch or dinnertime and then the noise level rises dramatically. Offices and homes are also common locations for recorded conversations. In these case try to control as much as you can turning off all radios, televisions and speaking away from crying babies, kitchen blenders and so on. The usual recorders used by consumers for face to face recordings are microcassette and cassette recorders. Nowadays you might consider using a minidisc recorder for higher quality recordings. Microcassettes are the least expensive way to go, followed by cassettes, with a little better quality, but larger recorders. Minidisc recorders are the best being relatively small but at a higher cost. All of these machines will record a meeting, with varying degrees of quality. Lengths of recording times are as follows:
No matter which type of machine that you use, I recommend using an external microphone. In this way the machine can be concealed either on your person or inside a handbag or briefcase or other enclosure, while the head of the microphone can be exposed for better pickup of the conversation. Also, the internal machine noise, and vibration of its motor will be minimized as opposed to its pickup using the machines internal microphone. Finally, the internal microphone suppled with a microcassette recorder, for example, is not of the highest quality. External microphones have superior frequency response and sensitivity. Incidentally, in the case of microcassette recording, it is desirable, if your meeting is not expected to be long, to use the high speed on the microcasette recorder. This will result in a higher quality of recording with the trade-off of half the recording time per side as shown in the chart above. Carry the recorder in your pocket or in a place where it will not be evident. Run the microphone wire under your shirt and position it as high as possible for maximum pickup of speech. I have heard recordings made by people who recorded using a recorder hidden in their boots with disastrous results, as one would expect. The higher the better for microphone placement is the rule. Once everything is in place do a test recording to familiarize yourself with the controls and location of the recorder and microphone. Then play it back to evaluate how successful you were in your test. Assuming that everything worked well, you are ready for the meeting. Make sure that you have fresh batteries in your recorder. I have seen horror stories of undercover law enforcement meetings with organized crime bosses recorded on machines with dead batteries. A word to the wise. Record a preamble, as in the case of telephone recording, with an announcement of who you are, the date and time, and where you are and whom you are going to meet. Make sure that the voice-activation feature, if any, is disabled. During the meeting encourage your subject to speak up and repeat any important facts if you can. If money is exchanged, count it aloud. If dates are an issue, state them clearly. Speak normally and don’t talk any louder than normal. The microphone will be able to pickup a normal conversation at normal speaking level. Once the meeting is completed, privately record a postscript with the time and confirming that you are turning off the machine. Then back at home you can punch the record-protect tab, or in the case of a minidisk, open the record protect window slide, and listen to the tape to confirm that it was recorded properly. Label and store the tape as in the case of the telephone recording described above. Videotape Recording requires a little more preparation to insure success. First, camera placement and lighting are important. Do not shoot into the light. Also make sure that there is adequate lighting where the subject is expected to be located. You can use a self-contained camcorder, or separate camera and videocassette recorder. There are also miniature camera-transmitter combinations that transmit the video signal to another location where it can be viewed and recorded. Also, if audio is to be recorded, as in the case of conversation recording described above, microphone placement is important. Use an external microphone if possible. This can make all the difference in the world with respect to intelligibility and professional quality of the recording to a viewer. I always advise law enforcement to have a large clock on the wall of any room in which statements by witnesses or subjects are videotaped. Banks always have clocks prominently displayed for their cameras. In this way the time of a recording is right in the frame, and it also serves to bolster the credibility of a tape. If the clock face appears continuous, then the recording must be continuous as well. After the recording, as in the case of audiotape recording, the record protect tabs should be punched to prevent accidental erasures or over-recording. Then the tape should be played to confirm that you have recorded the conversation or scene as desired. Finally the tape should be labeled and stored. The above suggestions are offered as
a result of 28 years of experience in the field of recording conversations
and optimizing them for trial. For additional recording tips I recommend
http://www.fantastictranscripts.com/tips.htm Good luck with your recording. Practice makes perfect. Paul Ginsberg, President
|
| Website by Rice Technologies |